Showing posts with label crafts. Show all posts

Saturday, January 11, 2014

Lordy, The Thing One Finds When Deep Cleaning

It is almost Christmas, and I'm in a frenzy.  Magic Man's family is coming HERE for the holidays.  I'm excited to be hosting, but what were we thinking?!?!

MIL is a terrific housekeeper.  Me?  Not so much.  I maintain a little dust and chaos is healthy for a home.  But push aside my beliefs, I want MIL to be comfortable.  So along with freezer food preparations, scrubbed floors and bathrooms - and I do mean scrubbed, there's washing sheets, rearranging the guest bedroom to open trundle for Magic Man and me.  (Can't let MIL and FIL sleep in those uncomfortable beds), decorating the house AND the Magic Shop Party Room, where the festivities will be held.  Home was a cheap hotel.  Food to be served at the Party Room where the rest of the family would camp.

All of this nonsense to let you know that in cleaning out the closets, I found a quilt top my Grandmother made, who knows how long ago.  She went into a nursing home in the early 80's.  We suspected it was made long before then.

When Granny was admitted to the nursing home, many of her possessions were divided; her house placed on the market, yada yada yada.  As the only grandchild who shared her passion for "making your own," I received this quilt top.  It had the batting and the backing, she started quilting but only finished about a 4" square, leaving me to finish the project.  With a 4-year old in the house, quilting was out of the question.  So the quilt went into the back of the closet, only to be recovered a month ago, almost 30 years later (see note about a little dust and chaos above).
Quilt Top on Frame
Now, life is calmer - just a tad, so I set up my quilt frame (never used, mind you) and tackled the project.  Magic Man came if from work, rolled his eyes and politely smiled at the monstrosity sharing our living room.  Justification - it isn't any larger than the Christmas tree, so I see no need for complaints.

Granny loved details.  She crocheted and tatted with sewing thread; knitted with fine yarns; hand stitches were practically invisible.  Her work was always exquisite.  She could sew like no one I knew and my daughter, her great granddaughter, has that same natural talent (but doesn't use it often).
Cross Stitched Detail
And now I'm quilting.  By hand.  It would be so much easier to send the top to April and let her long arm do the job.  That would not be acceptable by Granny.  I am happy the quilt lines are printed on the fabric.
Quilting, Quilting and Quilting
If you don't hear from me for a while, you know where I am.


Friday, November 22, 2013

Catching Up: Quilt for Layla

Layla is a very young lady battling a form of cancer normally found in retirees.  She moved to Texas from a land far, far away, then moved out of the country.  She and her family fell in love with Texas and its western, laid back lifestyle.  She loves horses.

My friends L and M purchased Texas and western fabric last Christmas, well just because they are really nice people, and added it to my stash.  It was perfect for Layla's horse quilt.  

My second quilt from start to finish in 3 days, interspersed with work.

Quilt Finished

Fav Fabric 1

Fav Fabric 2
I hope Layla finds comfort with her horses.


Wednesday, November 13, 2013

Catching Up: Toys for Tots

So!  I have been formally chastised for not posting pictures of my projects.  And not just the recent projects either.  Readers, I beg your support (and forgiveness), you know how it is - daily activities, family, and WIP often takes precedence over blogging.

Here goes Round 1...
Toys for Tots is one of my favorite Christmas charities, based on the fact that our US Marines sponsor this program.  They volunteer their lives for our freedoms and have a spare hand to help children at Christmas.  And - I love their commercial where the little girl asks the Marine if he's Santa, but haven't seen it in a couple of years.  It makes me tear-up thinking about it.

Purchasing a gift doesn't seem adequate, so I sew.  Normally I make rag edge quilts, one for a boy, one for a girl, but this year I ventured into something new:  Pillow Pets!  These little guys are so cute, so easy, so soft and cuddly.  The idea came from this site:  http://www.allfreesewing.com/Sewn-Toys/Sewing-Pattern-for-Pillow-Pet with written and video instructions. 

I followed most of their instructions making a quick mod suggested by granddaughter.  We replaced the step to sew the head to the pillow cover by sewing Velcro (loop side) to the cover and (hook side) to the back of the head.  I used two strips about 4" long, spacing them 1" apart.  Granddaughter loves that she can yank off the head, cuddle with it at nap time and still use the pillow.  Two gifts for the price of one.  I love it because I can wash the pillow cover, dry it easily, AND the loops on the Velcro don't attach to other items in the dryer.  Multi-tasking?  OK, that's a stretch.

Sigh, life is good.

Zebra

Pink Puppy - TFT

Cat - TFT

Friday, May 10, 2013

Happy Birthday to ME!! Gift #2 & 3

Gift #2
With the possum out of the way, it was time to move on to bigger and better things.  Hubby purchased a power sprayer to help clean the chicken coop.  Call me weird, but I am actually happy with it.  The second box was a little more interesting.

Gift #3
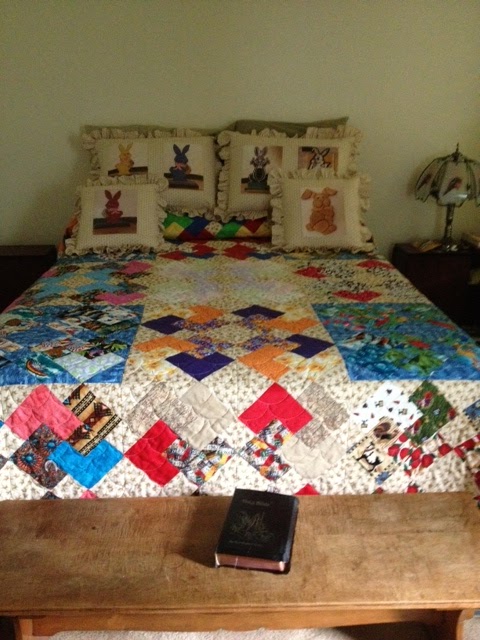
Magic Man and I met six years ago.  My friend Nancy likes Bruce and our relationship, we compliment each others creativity and humor.  Nancy is a gifted quilter, as you will see, wanted to capture that relationship in fabric.

She found fabric shortly after we married and was inspired to start a quilt for us.  The colors are the primary colors in the Magic Museum.  The quilt pattern is Card Trick.
Inspiration Fabric
Card Trick
 This project took a few years, revisions, consultations, and a whole lot of love to complete.

Quilt Front
There are 89 different fabrics in this quilt, gathered from all across the great USA.  Each one heart selected, based on Bruce and my professions, hobbies, passions, and faith.  She took the time to cut out the pattern in the fabric to piece into the quilt.  What kind of love is that?
The back is filled with applique bunnies, using the quilt fabric.
Nancy pushed creativity to the limit and appliqued rabbits on the back of the quilt, hopping around cards and more bunnies in the center of the quilt back.
Quilted pillows back
She took the time to quilt the backs of the pillows...
Quilted pillows front.
And honor Bruce's parents by printing photos of these rabbits they made and painted many years ago.  

The ensemble is beautiful.  BUT now we need a bigger bed.  :)
I wish I had words to express my joy and gratitude for this precious gift.  The time, expense, the love that went into this project cannot be measured.

All I can say is the God is so good to me for giving me the bestest of friends and family.


Thursday, May 9, 2013

Souped Up Coupe

This morning was "Modify the Coupe Day."  Magic Man decided we needed to enhance the "Coop de Ville," making it maintenance friendly.  Step 1, add a hatch system and Step 2, an improved feeding station.  For someone who groaned "Oh dear Lord!" when he first heard the coupe coop idea, he's taken quite a liking to the concept.

You may have seen the first posting of the Coop de Ville, in its early, but livable stage.  But here's what we did today.

Magic Man decided on a "hatch system" that 1) offers protection (we have raccoons, wild cats, and 'possums roaming about the 'hood) and 2) provides easy "open and close" access between the coop and run.  

The Hatch is two part system, one hatch attaches to the coop and another to the run.  The hatches can be coupled securing the living quarters together or quickly decoupled to ease cleaning and relocating the quarters in the yard.

Installing half of the Hatch System to the coop
Hatch closed

Hatch opened

Top view of the coupled hatch, now attached to the coop and the run.  The doors slip down closing either section.
The best part about this system is we can quickly close one or both sections, locking the girls in either half.

The next modification was the feeding system.  Every morning required cleaning the poopy feeder, sighing over wasted feed, and adding a fresh supply of feed.  We repeated this task each evening.

Then we found this feeding station on Pinterest.  We made a few tweaks, using 3" PVC and parts rather than the suggested 2" and we secured the feeders at the base instead of tying them to the walls.   Also, our feeders are 24" tall, purely a cosmetic choice, shorter than 4' tall feeders. 

Magic Man cut three holes in the trunk area, just large enough for the PVC tubing to slide through.  We attached the WYE and bases inside the coop and secured them to the floor.   And finally filled the feeders.  The material cost for three feeders was $30.  A fourth can be added for $7 for the extra WYE and Caps.  Not a bad deal, value-wise.  We can fill the feeders to capacity and the girls will be happy for a week.

Feeding Stations inside the Coupe

Feed Filling Tubes, easily accessed
Wow, what used to take us a good 30 minutes each morning, is now accomplished in about 10 minutes.
Finished Coupe, today

One problem we did not foresee.  What will granddaughter do?  She knows we carry feed to the chickens each morning and battle the chickens to move to greener patches.  She'll have to accept the fact she has more time to play in the morning before school.

Care to guess what the next addition will be?


Wednesday, April 24, 2013

Chicken Coop, no Chicken Coupe

Magic Man is very talented.  Here in the Big City North, he has a magic shop, theater & party room, and a workshop normally used to build large cabinet-styled stage illusions.  But then he has this wife who, on occasion, makes special and strange requests.

You may recall that about 6 weeks ago we brought home some baby chicks.  They lived in a brooding house for a few weeks, but grew so quickly we needed to transition them to a chicken coop.  I worked on design after design, never quite satisfied with the final idea.  Then one night, it came to me in a dream.  My girls need a Chicken Coupe.

Magic Man shook his head when I approached him with the request.  He took my sketch and "disappeared" (ha! pun intended) into the workshop.  A few days later, he called me to the workshop, handed me a can of primer and a brush and instructed me to get busy, priming the coop inside and out. (I found out just how limber I am not).  I primed on day one and painted the next day.  Day three we added the almost finishing touches.  It was enough for the girls to move in.

So here is their new home, the Coop de Ville.  The nesting area is under the hood, feeding station in the trunk.  The girls can roost in the driver's seat and enter the run through the passenger door.  We can open both side doors or the hood and quickly clean the coop.  Functional and fun - I'm happy.

Coop de Ville

 The girls love sitting the in Driver's seat.  Oddly enough, that is Daisy on the passenger side.
Driving Miss Daisy
 It is difficult to see, but there is a chicken run, that ghost-like image in the photo below, for the girls.  It looks a bit like a submarine.  The run has a "conning tower" to roost and observe the surroundings.  Alas, Magic Man will NOT let me paint the run yellow.  All together now, let's sing "We all live in a yellow submarine..."
Chicken run
I'll be adding more sections to the run as the days grow warmer.  I hope the girls won't think they are gerbils.

Friday, February 22, 2013

Creative Cousin's Coolest Kitchen Container

I have the most creative cousin who happens to be my FAVORITE cousin, but not solely for the creative reason.  She is also witty, funny, a great cook (she clings to Cajun traditional cooking), artistic, and has an eye for decor.  She hunts, fishes, gardens, and trains animals.  I have not found anything she cannot do.  Her mind is constantly churning whether it's something brewing on the stovetop or finding a way to repurpose, recycle, or reuse an item headed to the trash - or sometimes not.  That item may have been left unattended for a minute and is now hers.

Cousin D aka CCC or Crazy Cajun Cousin, is the most amazing person I know and I'm blessed with the good fortune to be related, and to be loved like her little sister.

CCC decorating for our wedding reception
So one of her recent repurposed projects that I love is her very handy "Wrap Rack."  It a common problem to find enough space for plastic zip bags, rolls of foil or plastic wrap, etc.  Cousin D, however, found the perfect solution.  She pulled an unused hanging shoe rack from the closet.  One quick glance, followed by a "Hmmmmm??" and she darted off to the kitchen and yanked Ziplock and Glad boxes from her pantry.  She slid them into the shoe slots and "voila" her storage problem was solved.  Almost.  She cut a slit in one of the shoe slots in order to retrieve the zip bags and decided that the plastic shroud was subject to ripping over time.  She dug out her trusty duct tape and reinforced the opening.  Now her plastic and foil items are handy, freeing oodles of pantry space.  The "mate" side of the shoe bag is perfect for holding the refill box.

It took me almost a year to find one of these shoe bag treasures and I grabbed it quickly when I did.  Sadly, it was the only one in stock.  But I have mine.  Not exactly matching my kitchen decor, but there are times, even with Cousin D's solutions, function ranks over beauty.

Cousin D's Wrap Rack hangs outside the pantry
I need to visit Cousin D soon and find her other creations to outfit my home and garden.

Love you my dearest Cousin.

Wednesday, January 11, 2012

Mooooore Monkeys!

I loved our little sock monkey when I was young.  A tad freaky, but he had his own charm.  My daughter found Sock Monkey at my Mom's and rescued him from the closet and moth balls.  At home, he spent some time in the whirling hot tub and hung out with the birds to dry.  With a bit of TLC, Sock Monkey was in loving arms again.

In May, my daughter and her hubby announced the arrival of our newest family member (you probably guess I'm overly excited now).  At that moment I knew there was going to be a sock monkey theme for the nursery.  I scoured the internet and found some wonderful fabric and embroidery designs.  It was time to sew and crochet.  Magic Man may be thinking I over committed with so many projects.

Dust ruffle fabric scraps, a package of cloth diapers, and some bright red thread were the basic components of these adorable burp towels.


Crafty Staci offered a quick method to add the trim to these towels.  The instructions were meant for an adorable trick or treat bag.  (I have a couple examples of the bag here and here.)

Any day now, I'll head to the Big City North to welcome my granddaughter.   Even Moooooore Monkeys will appear in future postings.

Tuesday, January 10, 2012

Tote-ally Transforming Bag/Pad

Several weeks ago, I saw an episode of "Sewing with Nancy" on PBS.  I can't recall the guest, but she made this very cool picnic tote.  With a few modifications, this is now a baby totepad for my granddaughter.

The ingredients:
* Cut two 36" squares of fabric (these pieces are heavy cotton from Ikea)
* Four 18" zippers
* thread
* 1 1/2 yards woven strap or belt material
* Two 1 1/4" D-loops
* 1 parachute buckle
* 1 large button
* 10" of elastic cord.

I found this 1 1/2" button at Jo-Ann's
Take the fabric for the outer bag, fold on the diagonal, as accurately as possible.  Steam and press.  Open and fold on the other diagonal.  Steam and press.

Along the fold, place a 3" mark on each side of the crease.  Measure and mark 19" up along this crease.  Mark 1.5" on each side of this last mark.  Draw a line connecting the two points, one on each side of the crease. ("Crease" is used too many times - sorry about that).  Flip the fabric over and repeat on the other side.  

Place the outside edge of one zipper on the straight line.  Pin and sew close to the teeth.

For the curved lines, I used a cake cover.  With the zipper closed, mark a point 3" from the end of the zipper (not the fabric part) nearest the fold.  This mark will be on the outer side of the zipper.  Place the large dinner plate or cake cover on the new mark and draw a circle.  Open the zipper and pin the fabric edge of the zipper. Sew next to the teeth.  Repeat for the other three zippers.  The instructions did not advise to do so, but I sewed the outer edges of the zippers.  Trim the zipper tips, if you desire.
Zippers sewn in place
With the right sides together, sew the two 36" squares together, leaving a 6" gap for turning.  Clip the corners, and topstitch the edges.
Sew the D-rings to the corner of the blanket.  
Attach the D-rings to the corner of the blanket.  Use the corners where the straight sides of the zippers would intersect.  Secure the woven strap to each D-ring and attach the buckle to the other ends.

Thread the elastic cord thru the button hole.
 Thread the 10" elastic cord thru the button hole so that the raw ends remain on the back side of the button. 
Secure the elastic 6" from the top point of the bag.
 Secure the button to the bag.  This button is about 6" down from the point.  Not the same point with the D-rings.

It's done.  Here's the bag opened to a blanket or changing pad.
 This handy tote can be used for a changing pad or a picnic in the park.
Zip the four sides together
Secure the top, wrapping the elastic loop around both points, then over the button.

Clip the parachute buckle and it's ready to go.
This project was so quick and easy I will make another one for ME!

Monday, January 9, 2012

Cover Story

I love babies.  Most of the time they smell nice, their giggles are sincere, and they love you unconditionally.

When asleep, sometimes it's nice to cover the little bundle of joy with something light.  I like a sheet in those instances.  When shopping for nursery sets, I can never find top sheets for cribs.  So I make them.

I finished thegranddaughter's top sheet today.  It's made from the same fabric as the pillow case.  Sheets are so quick and easy, it doesn't make sense to not add it to the set.

This sheet takes 2 yards of 42-45" fabric.  Cut about 3-4" off one end for the trim.  Exact measurements are not critical.

Place the right side of the trim to the wrong side of the sheet.  Sew the top edge with a 1/2" seam.  Press the seam toward the sheet. Press 1/2" along the raw edge of the trim. 

Press 1/4" seam around the other three sides.  Fold and press another 1/4" seam, completing a double fold.  Top stitch the three sides.

Fold the trim, right side up, over the right side of the sheet and press.  Embellish the trim with bias piping, pin and top stitch in place. 


Friday, January 6, 2012

Piece by Piece

I can hardly wait.  By doctor's predictions, Miss Zoe's arrival is less than three weeks away.  It's time for Iko (aka Grandma) to hurry, scurry and complete the projects started earlier in the gestation period.

Early this morning I made this little pillow case. Part of the Sock Monkey nursery set project was delayed, and delayed ...and delayed for back ordered fabric.  But it finally arrived and here it is, the finished product.
Tiny Pillowcase
Close-up
Tonight, we make the top sheet.

Oh happy news for me...  My buddy Mr. A went home for the holidays.  He brought some wonderful treats.  I haven't had these in years.

Note to Magic Man - they're mine, all MINE!!!  muahahahahahaha!!!!!!!!!!!

Thursday, January 5, 2012

Winter Fleece

There should be an Add-'vent calendar to countdown to exciting events.  The event is adding a new member to the family, but who knows when she'll arrive.  I'll keep making a daily gift until our little bundle of joys makes her appearance.

Last night I finished this blanket.  She and I can curl up and keep nice and warm... grandma and Zoe, no mommies allowed.  I fear I will have to share Zoe with her great-grandma.  She outranks me.
I loved this fabric.  It's rescue fabric from the remnant bin at Jo-Ann's, cut the perfect size for a cuddle blanket.   Grandma got lucky.

Wednesday, January 4, 2012

Magic Egg Bags

Man discovered I sew.  I guess that's my fault for keeping the sewing machine in the closet for so many years.  
 
I love this fabric
Magic Man demonstrated his Magic Egg Bag.  Then showed me improvements he'd like to see in "future models."


We experimented with different fabrics, techniques, bag sizes, and grippers.  He now has a favorite.  The others will be stocked for sale.  Feel free to visit the Illusion Warehouse, Magic Man's online magic shop for these and other magical items.

<> 
Looks like the Chicken Snake met his Fate.